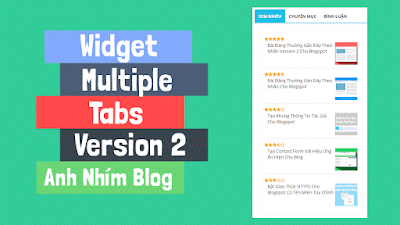
Tạo Widget chứa nhiều TAB trên một Sidebar cho Blogspot (Blogger )
Cập nhật ngày
Bởi Legend Phim
Như mình đã chia sẽ một lần nà đó về thủ thuật này nhưng khổ là cái version 1 là chỉ dáp dụng cho nội dung chứ không áp dụng cho các widget. Vì vậy lần này Yingvn sẽ giúp các bạn điều đó.
Mục Đích
- Giúp cho blog trong gọn hơn nhưng đầy đủ widget
- Giúp cho Blog đẹp hơn (có thể tùy từng blog)
 |
| DEMO |
Thực Hiện
1. Đầu tiên các bạn đang nhập Blogger >> Mẫu >> Chỉnh sửa HTML2. sau đó các bạn chèn đoạn code sau vào trước thẻ đóng </head>
<script src='//ajax.googleapis.com/ajax/libs/jquery/2.1.3/jquery.min.js'/>
<script type='text/javascript'>
$(function(){$(".tabs-1").mtabs()})
</script>Chú ý: nếu trong Blogspot bạn đã có dòng <script src='//ajax.googleapis.com/ajax/libs/jquery/2.1.3/jquery.min.js'/> rồi thì các bạn chỉ chép đoạn code dưới bỏ cái dòng đó đi. Có nhiều bạn tìm thấy dòng đó mà khác số 2.1.3 thì cũng coi như là có rồi nha.3. Sau đó các bạn chép đoạn CSS sau vào trước thẻ đóng ]]></b:skin> hoặc </style>
/* CSS Tabs */
.tabs, .tabs-list {margin:0;}
.tabs .tabs-list {padding:0;}
.tabs-menu {padding:0;margin:0;border-bottom:2px solid #21BFE1;}
.tabs-menu li{margin:0;text-transform:uppercase;list-style:none;text-align:center;display:inline-block;background:#fff;color:#444;cursor:pointer;position:relative;line-height:40px;font-weight:700;font-size:13px}
.tabs-menu li:hover {color:#4db2ec;}
.tabs-menu .active-tab span{text-align:center;display:inline-block;padding:2px 12px 0;background-color:#21BFE1;color:#fff}
.tabs-menu li span{display:block;padding:2px 12px 0}
.tabs-menu li:before {display:none;font-family:Fontawesome;text-align:center;font-size:16px;padding:2px 15px 0;}
.tabs-menu li:nth-child(1):before {content:'\f09e';}
.tabs-menu li:nth-child(2):before {content:'\f006';}
.tabs-menu li:nth-child(3):before {content:'\f0e6';}
.tabs-content {padding:10px;background:#fff;margin-bottom:15px}
.tabs-content .sidebar li {margin:0;padding:0;}
.tabs-content .widget li {background:#fff;float:none!important;}
.tabs-content .widget ul {background:#fff;overflow:visible;}@media only screen and (max-width:768px) {
.tabs-menu {text-align:center;margin:auto;}
.tabs-menu li span,.vitabs-menu .active-tab span,.top-menunav li.doremi {display:none;}
.tabs-menu li:before {display:block;}}Các bạn làm giao diện responsive mới làm còn không thì khỏi5. Sau đó các bạn tìm thẻ đóng </body> rồi chèn đoạn code sau vào trước nó.
<script type='text/javascript'>
//<![CDATA[
// Simple Tab
!function(a){"use strict";var b=function(b,c){var d=this;d.element=b,d.$element=a(b),d.tabs=d.$element.children(),d.options=a.extend({},a.fn.mtabs.defaults,c),d.current_tab=0,d.init()};b.prototype={init:function(){var a=this;a.tabs.length&&(a.build(),a.buildTabMenu())},build:function(){var b=this,c=b.options,d=c.tab_text_el,e=c.container_class;b.tab_names=[],b.$wrapper=b.$element.wrapInner('<div class="'+e+'" />').find("."+e),b.tabs.wrapAll('<div class="'+c.tabs_container_class+'" />'),b.tabs.each(function(c,e){var f,g=a(e),h=d;f=g.find(h).filter(":first").hide().text(),b.tab_names.push(f)}),a.isFunction(c.onReady)&&c.onReady.call(b.element)},buildTabMenu:function(){for(var b,c=this,d=c.options,e=d.tabsmenu_el,f=c.tab_names,g="<"+e+' class="'+d.tabsmenu_class+'">',h=0,i=f.length,j=function(){var a=arguments;return d.tmpl.tabsmenu_tab.replace(/\{[0-9]\}/g,function(b){var c=Number(b.replace(/\D/g,""));return a[c]||""})};i>h;h++)g+=j(h+1,f[h]);g+="</"+e+">",c.$tabs_menu=a(g).prependTo(c.$wrapper),b=c.$tabs_menu.find(":first")[0].nodeName.toLowerCase(),c.$tabs_menu.on("click",b,function(b){var d=a(this),e=d.index();c.show(e),b.preventDefault()}).find(":first").trigger("click")},show:function(b){var c=this,d=c.options,e=d.active_tab_class;c.tabs.hide().filter(":eq("+b+")").show(),c.$tabs_menu.children().removeClass(e).filter(":eq("+b+")").addClass(e),a.isFunction(d.ontabselect)&&b!==c.current_tab&&d.ontabselect.call(c.element,b),c.current_tab=b},destroy:function(){var a=this,b=a.options.tab_text_el;a.$tabs_menu.remove(),a.tabs.unwrap().unwrap(),a.tabs.removeAttr("style"),a.tabs.children(b+":first").removeAttr("style"),a.$element.removeData("mtabs")}},a.fn.mtabs=function(c,d){return this.each(function(){var e,f=a(this),g=f.data("mtabs");e="object"==typeof c&&c,g||f.data("mtabs",g=new b(this,e)),"string"==typeof c&&g[c](d)})},a.fn.mtabs.defaults={container_class:"tabs",tabs_container_class:"tabs-content",active_tab_class:"active-tab",tab_text_el:"h1, h2, h3, h4, h5, h6",tabsmenu_class:"tabs-menu",tabsmenu_el:"ul",tmpl:{tabsmenu_tab:'<li class="tab-{0}"><span>{1}</span></li>'},ontabselect:null}}(window.jQuery,window,document);
//]]>
</script><div class='tabs tabs-1'>
<b:section class='tabs-list tabs-list-1 section' id='tabs-list-1' showaddelement='yes'>
<b:widget id='PopularPosts1' locked='false' title='Xem Nhiều' type='PopularPosts' visible='true'>
<b:includable id='main'>
<b:if cond='data:title != ""'><h2><data:title/></h2></b:if>
<div class='widget-content popular-posts'>
<ul>
<b:loop values='data:posts' var='post'>
<li>
<b:if cond='!data:showThumbnails'>
<b:if cond='!data:showSnippets'>
<!-- (1) No snippet/thumbnail -->
<a expr:href='data:post.href'><data:post.title/></a>
<b:else/>
<!-- (2) Show only snippets -->
<div class='item-title'><a expr:href='data:post.href'><data:post.title/></a></div>
<div class='item-snippet'><data:post.snippet/></div>
</b:if>
<b:else/>
<!-- (3) Show only thumbnails or (4) Snippets and thumbnails. -->
<div expr:class='data:showSnippets ? "item-content" : "item-thumbnail-only"'>
<b:if cond='data:post.featuredImage.isResizable or data:post.thumbnail'>
<div class='item-thumbnail'>
<a expr:href='data:post.href' target='_blank'>
<b:with value='data:post.featuredImage.isResizable ? resizeImage(data:post.featuredImage, 72, "1:1") : data:post.thumbnail' var='image'>
<img alt='' border='0' expr:src='data:image'/>
</b:with>
</a>
</div>
</b:if>
<div class='item-title'><a expr:href='data:post.href'><data:post.title/></a></div>
<b:if cond='data:showSnippets'>
<div class='item-snippet'><data:post.snippet/></div>
</b:if>
</div>
<div style='clear: both;'/>
</b:if>
</li>
</b:loop>
</ul>
<b:include name='quickedit'/>
</div>
</b:includable>
</b:widget>
</b:section>
<b:section class='tabs-list tabs-list-2 section' id='tabs-list-2' showaddelement='yes'>
<b:widget id='Label1' locked='false' title='Chuyên Mục' type='Label' visible='true'>
<b:includable id='main'>
<b:if cond='data:title != ""'>
<h2><data:title/></h2>
</b:if>
<div expr:class='"widget-content " + data:display + "-label-widget-content"'>
<b:if cond='data:display == "list"'>
<ul>
<b:loop values='data:labels' var='label'>
<li>
<b:if cond='data:blog.url == data:label.url'>
<span expr:dir='data:blog.languageDirection'><data:label.name/></span>
<b:else/>
<a expr:dir='data:blog.languageDirection' expr:href='data:label.url'><data:label.name/></a>
</b:if>
<b:if cond='data:showFreqNumbers'>
<span dir='ltr'>(<data:label.count/>)</span>
</b:if>
</li>
</b:loop>
</ul>
<b:else/>
<b:loop values='data:labels' var='label'>
<span expr:class='"label-size label-size-" + data:label.cssSize'>
<b:if cond='data:blog.url == data:label.url'>
<span expr:dir='data:blog.languageDirection'><data:label.name/></span>
<b:else/>
<a expr:dir='data:blog.languageDirection' expr:href='data:label.url'><data:label.name/></a>
</b:if>
<b:if cond='data:showFreqNumbers'>
<span class='label-count' dir='ltr'>(<data:label.count/>)</span>
</b:if>
</span>
</b:loop>
</b:if>
<b:include name='quickedit'/>
</div>
</b:includable>
</b:widget>
</b:section>
<b:section class='tabs-list tabs-list-3 section' id='tabs-list-3' showaddelement='yes'>
<b:widget id='HTML1' locked='false' title='Bình Luận' type='HTML' visible='true'>
<b:includable id='main'>
<!-- only display title if it's non-empty -->
<b:if cond='data:title != ""'>
<h2 class='title'><data:title/></h2>
</b:if>
<div class='widget-content'>
<data:content/>
</div>
<b:include name='quickedit'/>
</b:includable>
</b:widget>
</b:section>
</div>
7. Lưu Mẫu lại và xem thành quả.
Nâng Cao
Muốn thay đổi màu thì tìm mã màu là #21BFE1 rồi thay đổi thành màu bạn thích
Vào đây lấy mã màu


Post a Comment